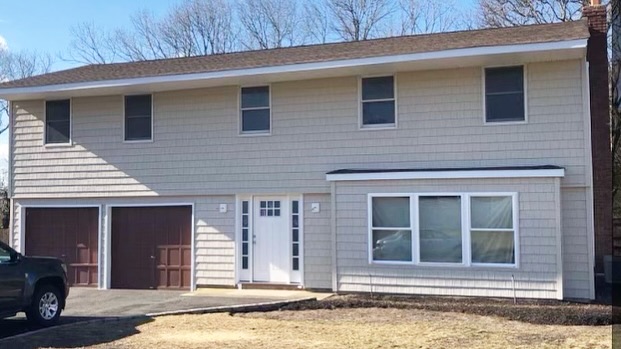
How Much Does a Dormer Cost on Long Island in 2026?

Adding a dormer is one of the most efficient ways to gain livable square footage on Long Island without expanding your home’s footprint. The cost varies significantly based on dormer type, size, structural requirements, and the specific town where your home is located. This guide breaks down realistic pricing for Long Island homeowners using current labor rates, material costs, and permit fee structures.

Dormer Types and What They Cost

Three dormer styles account for the vast majority of residential projects on Long Island. Each serves a different purpose and carries a different price range.

Shed Dormers

A shed dormer features a single flat roof plane that slopes at a gentler angle than the existing roof. This design maximizes interior floor space because it extends the full-height wall area across a wider section of the upper floor.

Typical cost on Long Island: $45,000 to $115,000

Shed dormers cost more than gable dormers because they span a larger portion of the roofline and require more extensive structural modifications. A full-width shed dormer across the back of a Cape Cod — the most common dormer project on Long Island — typically falls in the $75,000 to $115,000 range depending on interior finish scope.

Gable Dormers

A gable dormer projects outward from the roof with its own peaked roofline, creating a single window alcove. Gable dormers add light and headroom to a targeted area rather than expanding the entire upper floor.

Typical cost on Long Island: $25,000 to $50,000 per dormer

Homeowners often install gable dormers in pairs to balance the roofline visually. Two gable dormers on a front-facing roof typically run $50,000 to $95,000 installed, including exterior finishing and interior drywall.

Full-Width (Raised Roof) Dormers

A full-width dormer effectively raises the roofline across the entire length of the home, converting a 1.5-story house into a true two-story structure. This is the most extensive dormer project and carries pricing closer to a second-story addition.

Typical cost on Long Island: $100,000 to $200,000+

Full-width dormers require structural engineering for load path changes, temporary roof support during construction, and significant interior finishing work including new walls, flooring, electrical, and HVAC extensions.

Cost Comparison Table

Dormer Type Size Range Long Island Cost Range Best For
Gable (single) 8–12 ft wide $25,000–$50,000 Adding light and headroom to one area
Gable (pair) Two 8–12 ft units $50,000–$95,000 Balanced curb appeal with targeted space gains
Shed (partial width) 12–20 ft wide $45,000–$75,000 Expanding one section of the upper floor
Shed (full width) 20–40 ft wide $75,000–$115,000 Maximizing upper-floor living space
Full-width raised roof Entire roofline $100,000–$200,000+ Converting a Cape Cod to full two-story

What Drives the Cost Up or Down

Dormer pricing on Long Island depends on several factors beyond the dormer type itself.

Factors that increase cost:

  • Structural reinforcement needed for existing floor joists or bearing walls
  • Extending plumbing or HVAC into the new dormer space (adding a bathroom upstairs, for example)
  • Custom window configurations or oversized openings
  • Roofing material matching — slate, cedar shake, or architectural shingles each carry different tie-in costs
  • Homes with asbestos siding or lead paint requiring abatement before exterior work begins

Factors that keep costs lower:

  • Existing roof structure with adequate ridge height and sound framing
  • Choosing standard window sizes that do not require custom headers
  • Limiting the dormer scope to shell construction with owner-managed interior finishing
  • Scheduling during off-peak months (late fall through early spring) when contractor availability is higher

Long Island Labor Rates in 2026

Labor represents roughly 40% to 50% of total dormer project cost on Long Island. Skilled carpentry labor on the island currently runs $65 to $95 per hour depending on the trade and the contractor’s overhead structure. Framing crews, roofers, siding installers, electricians, plumbers, and drywall finishers each contribute their own rate to the overall labor budget.

Long Island labor rates consistently exceed national averages by 25% to 40% due to higher cost of living, prevailing wage requirements on certain project types, and strong demand for skilled trades across Nassau and Suffolk Counties.

Permit Fees and Requirements

Every dormer addition on Long Island requires a building permit from the local town. Permit fees, review timelines, and required documentation vary by municipality.

Town of Islip permit fees (representative example):

  • Building permit application: $75 base fee plus per-square-foot calculation
  • Plan review fee: varies based on project valuation
  • Certificate of occupancy inspection: included in permit fee
  • Typical total permit cost for a dormer: $800 to $2,500 depending on project scope

Documentation typically required:

  • Architectural drawings showing existing and proposed conditions
  • Structural engineering calculations for load-bearing changes
  • Survey showing existing lot coverage and setback distances
  • Energy code compliance documentation (insulation, window U-values)

Permit review timelines on Long Island range from 4 to 12 weeks depending on the town and whether variances are needed. Projects that exceed lot coverage or setback limits require a hearing before the Zoning Board of Appeals, adding 2 to 4 months to the timeline.

How Dormer Costs Compare to Other Space-Adding Options

Homeowners weighing a dormer against other ways to gain square footage should consider the cost-per-square-foot comparison.

Project Type Cost per Square Foot (Long Island) Foundation Work Required
Dormer addition $150–$350/sq ft No
Ground-floor room addition $250–$500/sq ft Yes
Second-story addition (full) $200–$450/sq ft Possibly (foundation reinforcement)
Finished basement $75–$150/sq ft No (existing foundation)

Dormers deliver a favorable cost-per-square-foot ratio because they build on the existing foundation and roof structure rather than requiring new concrete, excavation, or major site work.

Red Flags in Dormer Estimates

Watch for these warning signs when reviewing contractor proposals:

  • A lump-sum price with no line-item breakdown — you should see framing, roofing, siding, windows, electrical, insulation, drywall, and finishing as separate categories
  • No mention of structural engineering review or permit costs
  • A timeline that does not account for permit approval lead time
  • No discussion of how the new dormer roof ties into the existing roofing system and flashing details
  • Pricing significantly below the ranges in this guide without a clear explanation of what is excluded

The Bottom Line

Dormer costs on Long Island in 2026 range from $25,000 for a single gable dormer to $200,000+ for a full-width raised roof conversion. The right choice depends on how much space you need, the structural condition of your existing roof, and how you plan to use the new upper-floor area.

A single gable dormer suits homeowners who need targeted headroom and light in one room. A full-width shed dormer makes sense when the goal is to convert an unusable attic into a full bedroom suite or multi-room second floor. The full raised-roof approach applies when the scope essentially involves creating an entirely new story.

Next Steps

Measure your attic ridge height and note the current roof pitch — these two numbers determine feasibility before anything else. Photograph your roofline from the front and rear of the home so any contractor you consult can evaluate dormer placement options quickly.

Meigel Home Improvements has built dormer additions across Long Island for homeowners looking to unlock the space their homes already have. Call (631) 430-5995 or visit meigelhomeimprovements.com to discuss your project. If you are in the Hauppauge area, we are right in your neighborhood.


In-Law Suite Additions on Long Island: Zoning, Costs, and What to Expect

Multi-generational living is accelerating on Long Island. Aging parents who need daily support, adult children returning home, and families who want to keep grandparents close without sacrificing anyone’s independence — these scenarios drive one of the most requested home addition types: the in-law suite.

Building a self-contained living space within or attached to an existing home involves zoning regulations, construction considerations, and design decisions that differ from a standard room addition. This guide covers the zoning landscape in Suffolk County, realistic cost ranges, and the practical details that determine whether an in-law suite will work on your property.

What Qualifies as an In-Law Suite

An in-law suite (also called an accessory dwelling unit or ADU in zoning language) is a self-contained living space with a private bedroom, bathroom, and kitchenette or full kitchen. Most in-law suites include a separate entrance so the occupant can come and go independently.

Common configurations:

  • Attached addition: A new wing built onto the existing home with its own entrance, bedroom, bathroom, kitchenette, and small living area
  • Above-garage conversion: Converting space above an attached or detached garage into a finished apartment
  • Basement conversion: Finishing a walkout or garden-level basement into a self-contained unit with egress windows and a separate entrance
  • Interior conversion: Repurposing existing rooms (a ground-floor bedroom, den, and half bath) into a connected suite with a kitchenette addition

Each configuration carries different cost implications, zoning treatment, and construction complexity.

Zoning Rules for In-Law Suites in Suffolk County

Zoning is the single biggest variable in whether an in-law suite project moves forward. Suffolk County towns regulate accessory dwelling units through their individual zoning codes, and the rules vary significantly from one municipality to the next.

Town-by-Town Variation

Some Suffolk County towns allow accessory apartments by right in certain zoning districts, while others require a special use permit or conditional use approval. A few restrict accessory apartments to family members only or impose owner-occupancy requirements (the homeowner must live in either the primary home or the accessory unit).

General zoning requirements across most Suffolk County towns:

  • The property must be in a residential zoning district
  • The primary dwelling must remain the larger unit
  • The accessory unit typically cannot exceed 33% to 40% of the primary home’s habitable area (or a fixed cap, often 600 to 800 square feet)
  • Adequate off-street parking must be provided (usually one to two additional spaces)
  • The lot must meet minimum size requirements (varies by town and zoning district)
  • The unit must comply with all setback, lot coverage, and building code requirements

New York State ADU Legislation

New York State has been expanding ADU-friendly legislation in recent years, pushing municipalities to relax restrictions that previously made accessory dwelling units difficult to build. Homeowners should check with their town’s building department for the most current regulations, as rules adopted even within the past 12 months may have changed what is permissible on your lot.

The Permit Process

Typical steps for permitting an in-law suite:

  1. Zoning pre-check with the building department to confirm the project is allowed on your lot
  2. Architectural plans prepared showing the suite layout, egress, ventilation, and separation from the primary dwelling
  3. Building permit application with structural, electrical, and plumbing plans
  4. Health department review if a separate septic connection or additional septic capacity is required (common in non-sewered areas of Suffolk County)
  5. Inspections during construction at standard milestones (foundation, framing, mechanical rough-in, final)
  6. Certificate of occupancy issued upon passing final inspection

Septic capacity is a frequently overlooked constraint on Long Island. In areas without municipal sewer service, the existing septic system may not have capacity for an additional dwelling unit. A septic engineer can evaluate the system and determine whether an upgrade or expansion is required — adding $10,000 to $30,000 to the project cost if a new system is needed.

Realistic Cost Ranges

In-law suite costs on Long Island vary widely based on configuration, finish level, and whether the space requires new foundation work or builds within the existing structure.

Configuration Typical Cost Range (Long Island) Square Footage
Basement conversion (walkout) $50,000–$100,000 400–800 sq ft
Interior conversion (existing rooms) $30,000–$75,000 300–600 sq ft
Above-garage conversion $60,000–$120,000 400–700 sq ft
Attached ground-floor addition $120,000–$250,000 500–900 sq ft

Cost drivers that push toward the higher end:

  • New foundation and slab work (attached additions)
  • Full kitchen installation versus a kitchenette (adds $15,000 to $30,000)
  • Separate HVAC system (mini-split or dedicated zone): $4,000 to $12,000
  • Separate electrical panel and utility metering: $3,000 to $6,000
  • Accessible design features (wider doorways, roll-in shower, grab bars): $5,000 to $15,000 above standard construction
  • Septic system expansion: $10,000 to $30,000

Aging-in-Place Design Considerations

Many in-law suites are built specifically to support an aging parent, which means the design should anticipate mobility changes over the next 10 to 20 years — even if the parent is currently mobile and independent.

Aging-in-place features worth building in from the start:

  • Zero-threshold entries at the exterior door and shower — no step-ups or curbs to navigate
  • 36-inch minimum doorways throughout the suite (standard interior doors are 30 to 32 inches, which does not accommodate walkers or wheelchairs)
  • Blocking in bathroom walls for future grab bar installation — even if bars are not installed at move-in, the reinforced backing is ready when needed
  • Lever-style door handles and faucets that do not require grip strength to operate
  • Non-slip flooring throughout, particularly in the bathroom and kitchen
  • Adequate lighting with rocker switches at accessible heights (42 to 48 inches vs. standard 48 to 52 inches)
  • First-floor location with no stairs required to access any part of the suite

Building these features during initial construction adds minimal cost compared to retrofitting them later. Widening a doorway during framing costs a few hundred dollars; widening it after drywall, trim, and flooring are installed costs several thousand.

What a Self-Contained Suite Needs

Minimum components for a functional in-law suite:

  • Private bedroom (minimum 100 square feet per building code, 120+ preferred)
  • Full bathroom with shower or tub (walk-in shower strongly recommended for aging-in-place)
  • Kitchenette with sink, refrigerator, microwave, and two-burner cooktop — or a full kitchen if space and budget allow
  • Living/sitting area (can be combined with the bedroom in smaller configurations)
  • Separate exterior entrance (required by most zoning codes for ADUs, and essential for the occupant’s sense of independence)
  • Adequate closet and storage space
  • Independent heating and cooling (mini-split systems are the most cost-effective option for additions)
  • Smoke detectors, carbon monoxide detectors, and egress windows per building code

Red Flags During Planning

Be cautious if:

  • A contractor proposes building the suite without confirming zoning approval first — discovering the project is not permitted after construction begins creates serious legal and financial exposure
  • The proposal does not address septic capacity on properties without sewer connections
  • No fire separation is included between the suite and the primary dwelling (building codes require specific fire-rated assemblies depending on configuration)
  • The design relies entirely on shared HVAC with the primary home, which often leaves the suite uncomfortable and creates thermostat conflicts
  • Aging-in-place features are described as “easy to add later” — they are always cheaper and more effective when incorporated during construction

The Bottom Line

An in-law suite on Long Island typically costs between $50,000 and $250,000 depending on whether you are converting existing space or building a new addition. Zoning approval is the first gate — confirm what your town allows before investing in architectural plans. Septic capacity is the second gate for properties without sewer service. After those two variables are resolved, the project follows a predictable path through design, permitting, and construction.

The investment pays dividends beyond resale value. Keeping a parent close while preserving independence for both households is the primary motivation for most families pursuing this project — and the return on that decision compounds with every year of proximity and support.

Next Steps

Call your town’s building department and ask two specific questions: Does my zoning district allow an accessory dwelling unit? What are the size and occupancy restrictions? Those answers determine feasibility before any other planning begins.

Meigel Home Improvements builds in-law suites and home additions for Long Island families who want to keep everyone close without compromising anyone’s space. Call (631) 430-5995 or visit meigelhomeimprovements.com to discuss what works for your property and your family.


Converting a Cape Cod to a Colonial: Full Dormer Addition Guide

Long Island is built on Cape Cods. The post-war housing boom of the 1950s and 1960s filled Nassau and Suffolk Counties with thousands of 1,000- to 1,200-square-foot Cape Cod homes designed for smaller families and a different era. Sixty years later, those compact second floors with sloped ceilings and knee walls leave homeowners with bedrooms they can barely stand up in and attic space that sits unused.

A full-width shed dormer transforms a Cape Cod into a Colonial-scale home — doubling the usable upper floor and fundamentally changing how the house lives. This guide covers the structural process, floor plan possibilities, and practical considerations for Long Island homeowners weighing this conversion.

What a Full-Width Shed Dormer Actually Does

A standard Cape Cod has a steeply pitched roof that creates a triangular attic space. The usable area — where ceiling height meets the 7-foot minimum code requirement — is limited to a narrow strip down the center. Sloped ceilings on both sides of the ridge eat into every room.

A full-width shed dormer removes the rear roof slope and replaces it with a raised wall and a gently pitched shed roof. The result: full-height walls from front to back across the entire upper floor. Rooms that previously felt like afterthoughts become proportioned living spaces with standard ceiling heights, proper window placement, and layouts that function like any conventional second-floor bedroom or bathroom.

From the street, the front roofline stays intact (preserving the Cape Cod character). From the rear, the home reads as a full two-story structure.

The Structural Engineering Behind the Conversion

Cape Cod-to-Colonial conversions involve significant structural modifications. Every project requires a licensed structural engineer to design the load path changes before construction begins.

Key structural considerations:

Ridge Board and Rafter System

The existing Cape Cod roof relies on rafters running from the ridge board down to the exterior walls. Removing the rear rafters to create the dormer opening means the remaining front rafters lose their opposing support. The engineer designs a new structural system — typically a beam or header at the dormer junction — to carry roof loads that the removed rafters previously handled.

Rafter Ties and Collar Ties

Rafter ties (or ceiling joists) connect opposing rafters near the wall plate to prevent the walls from spreading outward under roof load. When the rear rafters are cut, the tie system must be redesigned. Engineers typically specify new tie connections, structural headers, or engineered lumber beams to maintain lateral stability.

Floor Joist Capacity

Many original Cape Cods used 2×6 or 2×8 floor joists for the upper level — adequate for attic storage but undersized for full-time bedroom and bathroom loads. The engineer evaluates whether the existing joists can carry live loads (40 pounds per square foot for living space) or whether sistering, supplemental beams, or joist replacement is needed.

Foundation and Bearing Walls

The added weight of the dormer structure, new walls, and finished rooms transfers down through the existing bearing walls to the foundation. Homes with solid poured concrete or block foundations typically handle this without modification. Older homes with rubble or fieldstone foundations may need reinforcement at bearing points.

Before and After: Floor Plan Possibilities

The transformation a full-width shed dormer creates opens floor plan options that the original Cape Cod layout could never accommodate.

Typical Cape Cod upper floor (before):

  • Two small bedrooms with 5-foot knee walls and sloped ceilings
  • One shared bathroom (if any — some Capes have only a first-floor bath)
  • No closets or minimal closet space tucked under the eaves
  • Narrow stairway with tight headroom at the top landing

After full-width shed dormer:

  • Three or four bedrooms with 8-foot flat ceilings throughout
  • Primary suite with walk-in closet and en-suite bathroom
  • Hall bathroom serving secondary bedrooms
  • Linen closet or storage room
  • Widened stair landing with full headroom

Common layout configurations:

  • Three-bedroom with primary suite: The largest rear-facing room becomes the primary bedroom with closet and bathroom. Two additional bedrooms face front with a shared hall bath.
  • Four-bedroom family layout: Four bedrooms (two front, two rear) sharing two bathrooms. Maximizes bedroom count for larger families.
  • Three-bedroom with bonus room: Three bedrooms plus a home office, playroom, or media room occupying the space a fourth bedroom would use.

The Construction Process: What to Expect

A full-width shed dormer on a Cape Cod follows a specific sequence. Understanding the phases helps homeowners plan around the disruption.

Phase 1: Permit and Preparation (6–14 weeks before construction)

Architectural plans, structural engineering, and building permit application. Some Long Island towns require 8 to 12 weeks for plan review on projects of this scale.

Phase 2: Roof Removal and Framing (2–4 weeks)

The rear roof slope is stripped and removed. Temporary weather protection (tarps or temporary roofing membrane) covers the opening. New dormer walls are framed, and the shed roof is installed. This is the most weather-sensitive phase — experienced contractors schedule it during a favorable forecast window.

Phase 3: Exterior Envelope (2–3 weeks)

New roofing, siding, and windows are installed on the dormer. Flashing details at the junction between the original front roof and the new dormer roof are critical for long-term waterproofing.

Phase 4: Mechanical Rough-In (2–3 weeks)

Electrical wiring, plumbing (if adding or relocating bathrooms), and HVAC ductwork or mini-split installation. Insulation follows mechanical rough-in.

Phase 5: Interior Finishing (4–8 weeks)

Drywall, flooring, trim, paint, fixtures, and hardware. Stairway modifications happen during this phase if the existing stair landing needs adjustment for the new layout.

Phase 6: Inspections and Completion (1–2 weeks)

Final building inspection and certificate of occupancy. Punch list items addressed.

Total construction timeline: 3 to 5 months from breaking ground to move-in, depending on scope complexity and weather.

Cost Ranges for Long Island Cape-to-Colonial Conversions

Full-width shed dormer conversions on Long Island typically fall between $85,000 and $175,000, with most projects landing in the $100,000 to $140,000 range. Projects that include adding a full primary bathroom, relocating the stairway, or installing central HVAC to the new second floor push toward the higher end.

Cost factors specific to Cape Cod conversions:

  • Asbestos siding removal (common on 1950s–1960s Capes): $5,000 to $12,000
  • Floor joist reinforcement: $3,000 to $8,000 if existing joists are undersized
  • HVAC extension to the new second floor: $8,000 to $15,000 for ducted systems, $4,000 to $8,000 for ductless mini-splits
  • Stairway reconfiguration: $5,000 to $12,000 depending on whether the stair location changes

Red Flags to Watch For

Be cautious of any contractor who:

  • Proposes a full dormer conversion without requiring structural engineering
  • Does not mention or plan for asbestos testing on homes built before 1980
  • Quotes the project without visiting the attic to assess existing framing, insulation, and floor joist sizing
  • Provides a timeline that does not account for the permit review period
  • Excludes roof tie-in and waterproofing details from the scope of work

Next Steps

Start in your attic. Measure the ridge height from the subfloor to the peak of the roof. Note the floor joist size (typically stamped on the lumber). Look for signs of water intrusion, insulation condition, and any previous modifications. Take photos of the roof framing from inside the attic — these give a contractor an immediate read on the starting condition.

Meigel Home Improvements specializes in dormer additions that convert Long Island Cape Cods into the full-size homes their owners need. Call (631) 430-5995 or visit meigelhomeimprovements.com to schedule a consultation and walk through what your Cape Cod could become.


Why Kitchen Remodels Are One of the Best Home Investments

The kitchen drives more daily decisions about comfort, routine, and household efficiency than any other room. It also drives more buyer interest than any other room when a home goes on the market. That combination — immediate lifestyle improvement plus long-term financial return — makes kitchen remodeling one of the strongest investments a homeowner can make.

Here is what the numbers, the functionality gains, and the buyer psychology actually look like when you break them down.

The ROI Numbers Favor Kitchen Remodels Consistently

National remodeling cost-versus-value studies repeatedly place kitchen renovations among the top projects for recouping investment at resale. A midrange kitchen remodel typically recovers 70% to 80% of its cost, while minor kitchen remodels — updated countertops, cabinet refacing, new fixtures, and modern appliances — can recover even more because the spend-to-impact ratio stays favorable.

What matters most for ROI:

  • Updating visibly dated materials (laminate countertops, old tile, worn cabinetry)
  • Replacing appliances with energy-efficient models
  • Improving layout flow without moving plumbing unnecessarily
  • Matching finishes to current buyer expectations in your local market

Over-improving beyond the neighborhood’s price ceiling is the main risk. A $120,000 kitchen in a neighborhood where homes sell for $400,000 will not return proportionally. A licensed contractor familiar with local home values can help calibrate scope to maximize return.

Outdated Layouts Cost You Time Every Day

Many homes built before 2000 feature closed-off galley kitchens, insufficient counter space, and poor traffic flow between the refrigerator, sink, and stove. These layouts force homeowners into inefficient patterns — reaching across the kitchen for prep space, navigating bottlenecks during meal prep, and running out of room when more than one person needs to cook.

A well-planned remodel addresses the work triangle (the path between your three most-used stations), adds counter space where prep actually happens, and opens sightlines so the kitchen connects to adjacent living areas.

Functionality red flags in your current kitchen:

  • Fewer than 15 linear feet of base cabinetry
  • No landing space next to the refrigerator or oven
  • A single overhead light fixture as the primary light source
  • Traffic paths that force people to walk through the cooking zone

Modern Kitchens Are the First Thing Buyers Evaluate

Real estate agents consistently report that kitchens sell homes. Buyers form opinions within seconds of walking into a kitchen, and dated spaces create an immediate mental discount — even when the rest of the home is well-maintained.

Updated kitchens signal that the home has been cared for and that the new owner will not face an expensive renovation immediately after closing. Quartz or granite countertops, soft-close cabinetry, stainless or panel-ready appliances, and adequate lighting have become baseline expectations for buyers in competitive markets.

Energy Efficiency Gains Compound Over Time

Replacing a 15-year-old refrigerator, dishwasher, and range with Energy Star-rated models can reduce kitchen-related energy consumption by 20% to 30%. LED under-cabinet lighting and updated ventilation systems add further savings. These reductions accumulate year over year, offsetting a meaningful portion of the remodel cost before you ever factor in resale value.

Upgrades with the strongest efficiency payback:

  • Energy Star refrigerator (typically the largest kitchen energy draw)
  • Induction cooktop (faster heating, less wasted energy than gas or electric coil)
  • LED task and ambient lighting throughout the workspace
  • Insulated windows if the kitchen includes an exterior wall

Storage Problems Signal a Kitchen That Has Fallen Behind

Cabinets stuffed beyond capacity, appliances stored on countertops because there is nowhere else to put them, and pantry overflow spreading into adjacent rooms — these are signs the kitchen no longer supports how your household actually operates. Modern cabinet systems with pull-out shelves, deep drawers, built-in organizers, and vertical dividers store significantly more in the same footprint.

A remodel focused on storage optimization alone can transform daily kitchen use without requiring a full gut renovation.

A Remodel Addresses Safety and Code Issues Simultaneously

Older kitchens often carry outdated electrical systems — insufficient outlets, no GFCI protection near water sources, and circuits that cannot handle modern appliance loads. Worn flooring creates trip hazards. Poor ventilation allows moisture and cooking byproducts to accumulate.

A kitchen remodel brings these systems up to current building codes, eliminating risks that homeowners often tolerate simply because the problems developed gradually.

The Bottom Line: A Decision Framework

A kitchen remodel earns its investment when two or more of these conditions apply:

  • The kitchen has not been updated in 15 or more years
  • Layout inefficiencies add friction to daily cooking and meal prep
  • Visible finishes (countertops, cabinets, flooring) look dated compared to comparable homes in your area
  • Appliances are nearing end-of-life or lack energy efficiency ratings
  • Storage capacity no longer matches household needs
  • Electrical or ventilation systems fall below current code

The project becomes less favorable when the scope significantly exceeds neighborhood value norms, when the home is being sold within six months (limiting enjoyment of the upgrade), or when structural issues elsewhere in the home demand attention first.

Next Steps

Start by listing the three things about your kitchen that frustrate you most on a daily basis. Then compare your kitchen’s finishes, layout, and appliances against recently sold homes in your neighborhood — online listings with photos make this straightforward.

When you are ready to move from frustration to planning, a professional remodeling contractor can walk your space, identify the highest-impact improvements, and build a scope that fits both your lifestyle and your budget. Meigel Home Improvements has helped homeowners transform their kitchens into functional, modern spaces that hold their value. Call (631) 430-5995 or visit meigelhomeimprovements.com to schedule a consultation.